Saturday, December 25, 2010

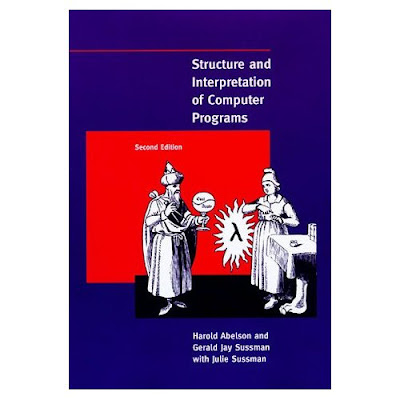
Structure and Interpretation of Computer Programs


Have started watching the MIT lecture series: Structure & Interpretation of Computer Programs


This should tie in nicely with my desire to learn LISP.

Friday, December 10, 2010

Sorting and Searching Algorithms and Project Euler


I've some extra time recently (well, not really), so I've decided to increase my understanding of sorting and searching algorithms.


The project hosting site above is where I'll be doing my work.

I'm also using this to get familiar with Java, and in particular: polymorphism, interfaces, exceptions, encapsulation, inheritance, and modularization.

I've also started doing some problems from the Project Euler site, an algorithm problem website. Here's some of my solutions:

Wednesday, December 8, 2010

33. Decathlon Design 3

This is the final phase of our solar decathlon home management system mockup for the semester. We've been tasked with taking our Balsamiq mockups and converting it to an HTML-Wicket Framework model.


What I learned from this:
I learned a lot about Wicket, and got some very helpful hints on web design as well. I also can see the advantages of a framework like Wicket; it allows the developer to bundle everything into a neat little archive file that can be run from any computer. And in the webpage sector, this involves bundling a webserver (we used Jetty) so that any prospective client can view dynamic web content as long as they have the Java JVM installed. This avoids the difficulty of having to set up a web server or the need to have internet access in order to view a dynamic web page.

What we did well:
I've been lucky enough to be part of a group that has two exceptional web designers and programmers, which makes it incredibly easy and efficient to get things accomplished. I thought that we did a good job on focusing on the development of a template. This really allowed us to push forward quickly with the knowledge that the framework that we were working on was sound and well-developed.

Some Difficulties Encountered:
There was a lot of time spent just figuring out how to get Wicket to do what we wanted to in the HTML markup. There was also some Javascript that we used for some of the interactive portions of the system, and importing different libraries and getting them to sync with the CSS files was challenging to say the least.

What I wish we had done differently:
I would've liked to have created my own CSS file for custom classes. I had to add a few CSS classes and during one instance, I updated the CSS and found that another team member had committed the same CSS file prior to me, resulting in a conflict.

Other than that, we had pretty good communication and met a number of times in-person as well as over the phone to ensure everyone was on the same page.

How did we satisfy the three prime directives?
The three prime directives of open source software engineering are:
  1. The system successfully accomplishes a useful task.
  2. An external user can successfully install and use the system.
  3. An external developer can successfully understand and enhance the system
Directive 1:
This system provides home users with a portal that allows them to view the current status of the major systems within the home. It also allows the user to change settings such as temperature, lighting, and security to name a few.

Directive 2:
Due to the use of the Ant build system, installing and running the embedded jetty server takes a single command: java -jar filename.jar

Directive 3:
Developers can edit the server-side source code via eclipse (distribution file has been included in downloads section).

Monday, December 6, 2010

LISP and Finding an Interpreter/Compiler

After hearing of the 'light switch' effect and nirvana that LISP brings about, and reading the following article:


I've decided to start learning LISP during Christmas break. I had about a 3-week crash course on it during my Computer Programming Concepts class, but I didn't really think much more of it other than 'okay that was cool, but I'll never use this again.'


The Search for An Interpreter/IDE

I started by going through a couple of the available LISP interpreters: GNU CLISP, Ufasoft LISP, and LispWorks.

I'd used LispWorks before but decided that I ought to try some other IDE to get a sense for what's out there.

After trying to install Ufasoft, I found that a Microsoft Visual Studio component needed to be installed first. Cancel -- I wanted something that could work on both my MacBook and Windows machines. GNU CLISP installed fine, but this gave a command-line only interface and a quick look through things did not uncover any extensive help information.

So back to LispWorks. Here we go!


Saturday, December 4, 2010

Network to Host Long Long

Since I'm applying for summer internships and employment now, I've been trying to hone my coding skills. I decided to implement my own version of network-to-host-long-long (ntohll) for 8-byte integers using bitwise operators in C. Operates similar to ntohs(short s).


This was for a group networking protocol assignment in my data networks class.


It was challenging, although time consuming, and later I found a much more elegant solution on the internet. But this my ugly bastard child and I'm keeping it.


Network to Host Long Long (Source Code)

/**
* Determines the host machine's endianness.
*
* @return 1 if Little Endian, 0 if Big Endian
*/

int checkEndian () {

void * p;
unsigned short * shortP;

unsigned char buffer[2];
p = (void * ) buffer;
shortP = (unsigned short * ) p;

* shortP = 0x01;

if (buffer[0] == 0x00){
if (debug) {
printf("Big Endian\n");
}
return false;
}

else {
if (debug) {
printf("Little Endian\n");
}
return true;
}

}

/**
* Given a long long number reverse the order of the bytes
* if the machine is Little Endian. Otherwise do nothing and
* return the number.
*
* @param input - network value to be converted to host order
*/
unsigned long long ntohll (unsigned long long input) {
if (checkEndian()){
unsigned long long result = 0;
unsigned long long mask = 0xFF;

if (debug){
// Print INPUT
void * p;
unsigned char * buffer;
p = (void *) &input;
buffer = (unsigned char * ) p;
int j;
for (j = 7; j >= 0; j--) {
printf("%x ", buffer[j]);
}
printf("\n");
}

// Input will be reversed
// Need to reverse all 8 bytes
int i;
for ( i = 0; i < 8 ; i ++){

if (i < 4) {
result = result | ((input & ( mask << (i * 8) )) << (8 * (7 - 2 * i) ));
}
else {
result = result | ((input & ( mask << (i * 8) )) >> (8 * ( 2 * (i - 4) + 1) ));
}
}
// Print resulting value
if (debug) {
void * p;
unsigned char * bufferResult;
p = (void *) &result;
bufferResult = (unsigned char * ) p;
int j;

for (j = 7; j >= 0; j--) {
printf("%x ", bufferResult[j]);
}
printf("\n");
}
return result;
}

// If Big Endian, we can just return value without swapping bytes
else {
return input;
}
}


Thursday, December 2, 2010

Google Visualizations for Final Project (ICS413)

NOTE:
chart size: Width x Height: 410 x 350 (&chs=410x350)
Title Font Size: 16.5 (&chts)
Axis Font Size: 11.5 (default)
Tick marks (y-axis, x-axis): 1,15 (&chxtc=1,15)

Energy Page:
(by Day)

(by Month)

Energy Breakout:
(by Day)

Temperature:
Aquaponics Statistics:
(pH by Day)

Aquaponics:
(Water Quality - Current Quick Look)

Aquaponics Water Reserves
(Current Levels)


Tuesday, November 23, 2010

31. Wicket Katas


We've been tasked with modifying a few example Wicket framework projects as "katas".

Wicket expertise prior to the Katas:
I've been slowly reading through the Wicket book. I think I a vague (albeit better) understanding of the difference between the static and dynamic model system. I would say that my understanding of Wicket as of now is still pretty elementary; I am still a little unsure about the whole component/model relationship and when a component gets re-rendered. Little by little, however, and as I continue to read the book, I've acquired a better understanding of the functions and underpinnings of the framework.

Here's a link to a description of the Katas: ICS413 Wicket Katas

Kata 1A: Duration - 30 min
Kata 1B: Duration - 10 min
Kata 1C: Duration - 2 min
Kata 2A: Duration - 1 hr 15 min
Kata 2B: Duration - 4 hours
Kata 3A: Duration - 30 min
Kata 4A: Duration - 5 min
Kata 4B: Duration - 20 min
Kata 6A: Duration - 2 min
Kata 6B: Duration - 2 min
Kata 6C: Duration - 2 hrs

Total Duration: 8 hrs 16 min
ALL Katas Completed.

Distribution Versions:

For the most part, a lot of these Katas were adapting already existing code to meet the specifications and weren't all that difficult. 2B, however, took a lot more time to figure out. Here's what we were tasked to do:

Kata 2B: Add a button on the home page with the label, "Make font bold". After the user pushes it, all the text on the page should become bold, and the button label should change to "Make font italic". When the user pushes that button, all of the text should change to italic and the button label should change to "Make font normal". Pushing that button changes the text back to its original state and the button label should now say "Make font bold".


This kata really forced me to examine the interaction between what's presented on the page versus what lives in the java code. I also had to attach a CSS style attribute to the body of the page, which had nested tags, so Wicket's hierarchical structure initially caused errors in the page. After matching the hierarchy with the Java code, I was able to use the attribute modifier function to toggle between font-weight: bold/normal and font-style: italic.

Another problem that I ran into was the toggling of the styles with a submit button. This meant saving a state of some sort, which I solved through use of a session. Prior to this, the flag I used to toggle between styles would not save it's state between page refreshes.

Finally, I had to implement a child class to the Link class. For some reason or another, the button and submit classes did not refresh the page as needed. In order to change the label on the button with each click, I had to create a child class to the link class and implement this toggling of the label within the constructor.

This was by far the most difficult of the 11 assignments.

Probably the second most interesting kata was the following:

Kata 6C: It is often convenient for web applications to consult a properties file when starting up in order to get configuration values. An easy way to do this is with the standard Java Properties mechanism. (See Java in a Nutshell for details on properties file manipulation.) For this Kata, modify your Example06 system to read in a file (if present) located in ~/.example06/configuration.properties. (Note that ~ means "the user's home directory", and that there is a System property in Java that provides this value.) This property file should contain a line like the following: deployment=true

Although not really enlightening in regards to improving my familiarity with Wicket, I did learn about Properties files in Java and how they're used to configure applications. This exercise also helped me brush up on catching exceptions and opening files and streams.

Conclusion
I liked these exercises. I thought they were very do-able and the combination of having templates to work from in addition to other resources (book and Google) really helped to lessen the frustration factor.

I'm starting to appreciate the framework and it's workings. Although by no means have I mastered models, I do have a basic understanding of them as well some of the limitations that the framework presents. E.g., the need to store variables in a session in order to preserve their current values.

The Cheeser example is starting to grow on me too the more I look at it and examine what it can do.


Sunday, November 21, 2010

30. WicketChart

Download Wicket Project - Click Here (verify build successful)

In our software engineering class we finally got back to programming. I've been pretty busy over the course of the past week, so I didn't have a chance to turn in the assignment on time. I did, however, feel that this assignment was important enough for me to complete regardless of whether I get credit for it or not.

Our assignment:
Using Wicket, implement a one page web application that provides two components: a form that accepts a variety of parameters along with a submit button that when pressed, generates a GoogleOMeter visualization. To see what a GoogleOMeter is, go to http://imagecharteditor.appspot.com/, then click "Show full gallery", then scroll to the bottom. The last three visualizations are GoogleOMeters.

Your form should allow the user to:
  • Set the start and end of the Y axis;
  • Set the title
  • Set the width
  • Set the height
  • Provide a data value for the pointer
Prior to doing this, we were tasked with reading the Wicket in Action book:

I managed to read about 100 pages of it. I actually started reading the first 59 pages, put down the book and proceeded to look through some examples first, and then went back, re-read the first 59 pages all over again, and then went on to around page 100 or so.

My Wicket App
I was able to then complete the following web application:


I decided to make the height and width adjustable from both the image attribute as well as the chart's URL (the dimensions of the chart itself are rendered according to dimensions embedded in the URL).

As required, I allowed the user to modify the Y-axis. I also made any change to the Y-axis correspond to a change in the scale of the chart. For some reason, modifying the Y-axis does not affect the chart unless you make the scale identical.

The rest of the user changes were pretty easy to implement once I got things rolling.

As far as testing goes, I first tested to ensure that the page was still rendered after the user entered a value (in this case, changing the chart's width).

The second test involved grabbing a rendered tag value to check whether the user entered width updated the width of the chart. Since the chart's width is stored in the URL of the image, I did a search through the value of the src tag for the width's new value. Both tests were successful.

Software Engineering
I started out with the example provided to us and made minimal changes to it. Each change was tested before moving on. I also commented as I went. As a general rule, I tend to over-comment, although not to the point of being El Capitan Obvious, but enough so that if I were reading it again, the thought process would be clear.

I think as far as software engineering goes, Wicket does allow for a lot more modularity in breaking things up between coders and designers. I've often viewed the source for a page only to be bombarded by code intermixed with html markup. Wicket seems to allow for some common-sense separation between the two - so that coders can do their jobs while designers can do theirs - concurrently.

Summary
Overall, I thought that the way this was presented to us was a good way to learn a new language/framework. It's good to start off with some tutorials or a cursory look through a book and then dive into code after that. Then, diving back into the book allowed me to have an even better understanding of things. I think this will serve as a good model for me as far as learning software languages goes.


Wednesday, November 17, 2010

27B. Decathlon Design 2

Solar Decathlon - DESIGN (Google Project: Team 6)

As part of our first group project in Software Engineering class, we were tasked with creating a full mockup of the solar decathalon house management system using Balsamiq.

My previous post described our group dynamics and how it related to issue-driven project management. This post will focus on the design aspect of our mockup project.

Overall the design process was pretty smooth. I think it really helps that all three of us have had extensive web design experience. We also seem to agree that clarity and simplicity are priorities when it comes to website design.

Noah designed the template, and I thought we did a good job of making thing consistent. We also took great pains to implement rounded corners where possible, as well as trickling down changes from the template down to the individual pages.

Below are some differences between the first and final iterations.

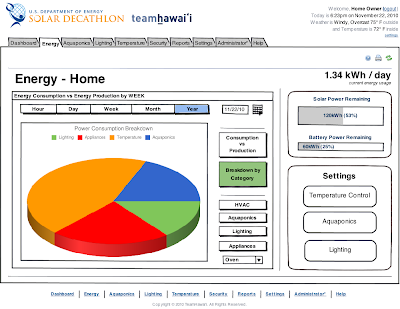
Energy 1st Version:

Energy 2nd Version: Rounded corners, standardized alignment, and some borders have been removed around charts. I think that this has produced a much cleaner look.

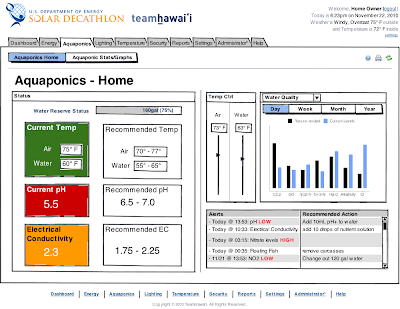
Aquaponics 1st Version:

Aquaponics 2nd Version:

Although we all had different ideas of what makes effective website design, I thought we were able to compromise and provide constructive feedback effectively. Since Noah has the most design experience out of all three of us, we usually deferred to his judgement in the end, even though he was still open to suggestions from the rest of the team.


27A. Decathlon Design 2

Solar Decathlon - PROJECT MANAGEMENT (Google Project: Team 6)

As part of our first group project in Software Engineering class, we were tasked with creating a full mockup of the solar decathalon house management system using Balsamiq.

I was paired with Anthony Kinsey and Noah Wooden. I feel quite fortunate to have these two team members, who are both quite competent when it comes to both programming and web design.

We met a total of four times to put together the initial draft of the mockups. Twice over the phone and twice in person over the past week. We then met one final time on Tuesday for about 5 hours to finalize things and standardize things.

The divvying up of work went very smoothly. This was done during the second meeting. During our third meeting we reviewed the template and reviewed a mockup for the security camera feed page that Anthony and I worked on. Subsequent meetings were used to work on our assigned pages.

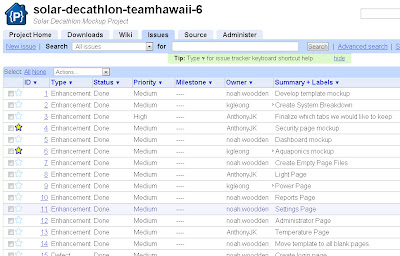
As for my input on the issue-driven project management, I thought that it worked well in the beginning, but after things started rolling, since we were all working together, the project really seemed to move along without us having to keep referring back to the issues page (shown below) on our Google project site.


I think tracking issues and assigning issues are probably essential when it comes to working in larger projects with more group members. There are probably many times when the group can't all meet together to do work, and issue tracking definitely helps tasks from falling through the cracks.

During most of our ICS classes, I've found it most beneficial to work together as much as possible. This means physically all being located in the same space rather than corresponding through email or IM. This makes it much easier for us to get immediate feedback from each other. It also helps to focus the team, therefore making the time spent more productive.

Our final two meetings were for 8 hours and 5 hours. I thought we were really able to get a feel for what each person's temperament is and also we were able to share a few laughs and even able to show each other some of the web pages and artwork we've worked on for clients.

All in all, I've enjoyed the design process so far - so far, things have been relatively painless and I've got good group members, which I've come to realize in any work situation is the most important thing.

Tuesday, October 26, 2010

24. Decathlon User Stories

The Solar Decathlon is an almost bi-annual competition between universities to build energy efficient homes.

This year the University of Hawaii was selected as one of the 20 participants, and our software engineering class has been tasked with producing user interface designs for the project's many systems.

The initial planning approach we're taking to defining requirements is called user stories. Rather than pinning down requirements that may keep changing over time, user stories are for the most part self-defined. They're narratives from the user's perspective about what they want the system to do. Usually, these are short and brief and don't get into specifics, and this allows the software designer to focus on what the user wants rather than forcing the user to come up with concrete requirements. This allows the user to be flexible in changing their mind, and it also allows the software developer to take some liberties on how to implement things, then be able to come back to the user for feedback.

Here are a few user stories for the project's House Management System (HMS):

POWER CONSUMPTION
  • User Story 1: An occupant can view the house's current power consumption in comparison to it's power production. This comparison will be able to be viewed graphically and numerically, and the user will be able to select different time frames (i.e., over the course of a week, month, or day). The system will also make it readily available and easily visible the delta between power consumption and production. This will allow the user to adjust the components in the house or their energy consumption habits in order to maximize their energy efficiency.

  • User Story 2: The system will also allow the occupant to view all connected devices and show their power consumption in graphical and numerical form. When a particular device or outlet is being used, the user will be able to view how the device is impacting power consumption as a whole. Devices or outlets can be grouped by category or location/rooms to offer further insight into power consumption habits and areas where the most impact can be made via power conservation methods. This will help the user pinpoint areas of concern and increase the speed of feedback as to how effective conservation methods are proceeding.
ENTERTAINMENT
  • User Story 3: The occupant will be able to access all entertainment options and offer a single control location for all entertainment devices. These include audio, gaming, and visual equipment. The system will also allow for the integration of multiple components, e.g., lighting response to audio system output or routing audio output from the gaming system to the surround sound system vs. headphones. Accessing different media will also be available, as multiple storage/output locations may exist (e.g., iTunes library, media server, Apple TV). The ability to view and operate all the systems in the house eliminates the need for multiple remotes as the occupant has the option of using either the display or their mobile device.
HVAC
  • User Story 4: The occupant will be able to monitor the heating, ventilation, and air conditioning systems and make adjustments to each to balance energy efficiency and comfort. Temperature control and power consumption of the different HVAC systems will be available to allow occupants to make informed decisions. The HVAC system will consume a lot of energy, so it is of utmost importance to give detailed but relevant information about the HVAC system and its impact on the house's energy consumption. Temperature sensors in each room will display temperatures in each area of the house to further allow the occupant to effectively manage power usage.
LIGHTING
  • User Story 5: The occupant will be able to monitor all lighting systems within the house as well as adjust the lighting or mode (all on, follow occupants/motion sensored, audio synchronization, etc.). Setting timers and lighting schedules will also be available through the interface. The user will also be able to see a power consumption impact of certain lighting configurations. This will allow the occupant to make decisions on brightness and choose between different settings and configurations to maximize energy efficiency.
AQUAPONICS
  • User Story 6: The system will also allow the occupant to monitor the chemical levels in the aquaponic system. Due to the importance of keeping the balance maintained in the aquaponic area, alerts will also be issued via display screen and text message so that the necessary adjustments can be made. This will facilitate the quickest response to any situation where chemical levels within the aquaponic environment are within critical levels. The system will also allow for management of automated controls, such as water temperature, heating, light exposure, etc. if available.
SECURITY
  • User Story 7: The status of the security system will be available for the occupant to view at any time. In the event of a breach, the security system software will send a text message to alert the occupant. The health of security sensors (disabled, online, offline, etc.) will also be displayed on a floorplan of the house. The occupant can also change the level of security/sensitivity and security response (alarm, police notification, laser beams) and response time. The security interface will also allow the user to configure the lighting system and how it responds to a security alert (red lighting, or lighting the area where the breach occurred). This allows the user to have full visibility of the security of their residence and also allow for faster and more appropriate response.

  • User Story 8: Computer security status will also be available to be viewed. All computers and devices on the network will be listed with IP address and data flow. All open ports will also be listed with activity status on each port, as well as any applications that are transmitting or receiving data. The interface will also allow the user to change router settings as well. This will allow for tighter network security since all activity and settings are available in one place.
VOICE ACTIVATION
  • User Story 9: The interface for the voice activation system will allow occupants to program commands as well as change settings (sensitivity of voice recognition, male/female voice on responses). Commands will be linked to the other automated systems within the house, such as HVAC, lighting, entertainment, etc. Monitoring of the many systems within the dwelling is also available by having status reports read back to the occupant over the house speaker system. This allows yet another interface to accessing the house's management system, the other interfaces being a display (touchscreen or mouse/keyboard controlled) and a mobile device (phone, tablet pc). This interface allows the occupant to access settings and monitor house systems instantly without having to have a device with them.
OTHER
  • User Story 10: The user will be able to access the main monitoring systems of the house via normal stdin/stdout as well as via touchscreen devices such as a mobile phone or display screen. This will allow the user to navigate and view all the systems on one display and will also allow for control or viewing from remote locations as well as from within the house. Possible uses could include warming or cooling the house prior to the occupant's arrival, or arming or disarming the security system remotely. The multiple display formats and remote access allows for a big increase in flexibility as far as usability goes.

  • User Story 11: All monitoring screens/systems will be integrated into a single application. The occupant will be able to seamlessly switch between the different house systems without having to open up different windows or software programs. This encourages wider monitoring of all systems, rather than heavy monitoring of a select number of systems, leading to better efficiency and planning. This also decreases the learning curve needed to use the system, as new occupants will be able to learn the system quickly.


23. Website Usability Review

As a website designer, it's very important for me to ensure that my webpages get the job done, both aesthetically as well as functionally.

Usability is paramount. Over anything else, you want the reader to come to your site, easily find what they're looking for and not get discouraged. You also want them to stay and listen to what you have to sell or say. The internet is a lot like the radio or TV. If the program you're watching or listening to is unclear or uninteresting or the music is bad, then usually you leave.

Good usability in website design means minimizing or eliminating turn-offs. The worst thing you want the user to feel is frustration. I think from all the readings I've done on effective web design and usability, the overarching theme seems to be a focus on simplicity and clarity. Usually a lot of thought and sometimes testing must be done in order to select what you want a user to get out of your site as well as how they should navigate through the site.

Some things that I thought were interesting:

don't use stock images. I've used stock images from dreamstime and iStock, and I've been very careful to select unique and interesting photos. I've also seen sites, however, that pick very generic stock photos, and it's obvious and easy to spot. It's really similar to looking at a sign for a store that's done in comic sans or picante (two easily recognizable fonts included with microsoft word). It screams of unoriginality and conveys to the viewer that there's nothing special here.

don't use anything that even resembles an ad. I didn't realize that even content that looks like an ad is ignored by website visitors. It makes a lot of sense, though; anything that looks like an ad probably is, and don't we all hate commercials?

Some good websites:
  • National Institutes of Health - http://www.nih.gov/

  • Suprisingly, this government organization has a very effective website. Clearly laid out with a clean, focused design, it adheres to normal website conventions, navigation bars at the left and top of the screen, and searches (e.g., job seach) that are easy to understand and filter. Search results area also displayed in a clear table format with important headers in bold. On first visit to the site, it's obvious where important information is and the site also offers a site map at the very bottom.
  • This site just blew me away. Does all it needs to do, shows the artist's work (he's an illustrator), and give you easy access to any pertinent information about him. Clear, beautiful, and a tremendously good job at showcasing his talents. All the elements, from the text font to the use of whitespace and composition of the site are all carefully selected to provide an aesthetically pleasing site as well as a website that is very easy for the user to navigate through. His portfolio also has enlarged portions of interesting parts of each work and intuitive next >> and previous navigation. A case where less is definitely more; the site really gets out of the way and gives a nice framework for the art to speak for itself.

Some bad ones:
  • Cyber Rebate - http://www.cyberrebate.com/

  • This website looks more like a template than an actual website. Filled with tons of stock photos and stock text, there's nothing that makes this website interesting. Even the name of the website is in regular text. This is usually the thing readers see first and it's important to catch their attention with it.
  • Cramped text, and no real sense of organization. And the design of the site is very plain with nothing that really grabs the attention of the reader. photos are inconsistent and appear to have been plucked from random places around the web. The lack of whitespace makes the site hard to read and disheveled.

Tuesday, October 12, 2010

21. RoboHosting

We started a new unit on project hosting and configuration management in class this week. While most of our assignments in previous classes have been individual, there have been a few instances where we've had to work on teams, and this has usually involved meeting at a person's house and sometimes even bringing over multiple desktop computers so that team members could switch off and work on the same files.

In my data networks class, we're actually just starting a project and I've set up a Google project hosting site for all of us to collaborate on. Although we'll still be meeting in-person to iron out things, the discussion board and Subversion repository should help us manage the configuration of the project.
The only downside is that we'll be using C for the project so we'll be without the use of ant. So for now, we'll probably have to deal with just the capabilities of make.

We were asked to accomplish the following tasks, and I was able to complete all of them without difficulty.
  1. Install an SVN client. Since I'm using a Mac, I chose SmartSVN. The interface is clean and easy to use, and I installed SmartSVN and checked out a project from Google's Subversion repository without any problems.
  2. Checkout, modify, and commit an existing project at Google Projects. This also went along without a hitch. I actually submitted twice since I forgot to run verify for the first commit. I had included a tab, which caused Checkstyle to fail. I can definitely see the importance of running some sort of verification check prior to committing a change.
  3. Create a new system hosted at Google Projects. This includes a Google Group discussion board, User and Developer Guides, as well as uploading all Ant and Source files for my Robocode robot.
Now that my code is out there in the public, there's even more pressure for me to improve the performance of my robot. It's a lot like art. You can doodle and keep all your horrible art away from the public eye, but once you put it up in a gallery for the world to see, the stakes go way way up.

Hopefully I'll have some time to tweak my code in the near future.

For now, I can definitely see the value of version and configuration management.

Wednesday, October 6, 2010

18. RoboTesting

In class we've entered the testing phase of our Robocode projects. This was quite a ramp up from the previous few class sessions, which were mostly focused on ensuring that Ant and Eclipse worked properly and were properly configured.


Tests Implemented through JUnit:
  • Assurance01 - Can the robot beat Corners 90% of the time
  • Assurance02 - Can the robot beat both VelociRobot and Crazy at least 40% of the time (in a 3-way battle with the robot coming in first)
  • Behavioral01 - Does the radar stay locked on a stationary enemy robot at least 90% of the time using the current scanning algorithm
  • Unit01 - Does the proportional firepower method calculate the correct values
  • Unit02 - Does the hypotenuse calculation function used to get the length of the battlefield's diagonal calculate correctly?
A few observations:
  • The Assurance tests by far were the easiest to create, since we were given a template/example. Unit tests also were fairly easy to implement as well. Since they involved simply plugging in relevant values that prove the calculations are done properly.

  • Behavioral tests by far took the most amount of time. In our behavioral tests we were given a parent class called RobotTestBed, which incidentally was written by our professor (after tracking it down on the google code site). What makes the behavioral tests so difficult is the fact that 1) the saved snapshots of bullets and robots can be a tad unpredictable and 2) the snapshots only offer limited insight into certain variables and methods. For example, the onScannedEvent method in the Robot class allows one easy access to the bearing of a scanned enemy robot. The Robot snapshot, however, has no such helper method, so a bearing must be computed by hand using trigonometric functions.

  • The test cases are somewhat limited. I think it tests two of the major aspects of my robot, but due to the cumbersome nature of testing a battle only simple tests were able to be implemented. E.g., the behavioral test was done with SittingDuck rather than a moving robot.

  • After running JaCoCo, it found that my tests covered 100% of my robot code. I think this may have been a byproduct of running the battles (10 rounds each) through JUnit, which allowed all the code to run all the way through.

  • As for redesigning my robot to ensure that testing is easier, modularizing calculation methods makes it infinitely easier to create tests for them. Also, coming up with the tests beforehand (as well as the requirements) and shaping the robot according to these guidelines would definitely have made things much easier.

Wednesday, September 22, 2010

Web Server

This was one of the cooler assignments I've had as a student: create your own webserver.

I've installed apache via Linux but I wasn't aware that it was so simple to make a basic webserver.

Webserver Details:
  • Language: POSIX C
  • Command Line Parameter: port number
  • HTTP 1.1
  • Method Supported: GET
  • Counts and displays accesses
  • Displays current server time
  • Hard-coded domain and file path names
Download webserver source code: here

I've included a few comments that are purely for learning purposes only. Thanks to Beej for outlining the socket library in such great detail.

14. Build System Samples

It seems that there are a lot of examples on how to execute a java file using Ant via a .jar file. But it was a little more difficult to figure out how to compile and run a .java file outright.

Here's my simple java file:
package ant;

public class HelloAnt {
public static void main(String[] args) {
System.out.println("Hello Ant!");
}
}


The main things to remember when using a package or IDE like Eclipse is to:
  1. include the classpath (the build directory)
  2. include the package name before the class name. E.g., ant.HelloAnt
<project name="HelloAnt" default="run">

<description>
Simple Ant build file for Hello Ant
</description>

<property name="src.dir" location="src" />
<property name="build.dir" location="build" />

<target name="clean">
<delete dir="${build.dir}" />
</target>

<target name="makedir">
<mkdir dir="${build.dir}" />
</target>

<target name="compile" depends="clean, makedir">
<javac srcdir="${src.dir}" destdir="${build.dir}" />
</target>

<target name="run" depends="compile">
<java classname="ant.HelloAnt" fork="true">
<classpath>
<path location="${build.dir}" />
</classpath>
</java>
</target>

</project>

Monday, September 13, 2010

09. Competitive Robot (Robocode)


Overview:
As part of our class Robocode tournament, we were each tasked with designing a robot for competition. I've combined what I discerned were the best qualities from our Robocode warm-up exercise due earlier in the week plus a few tweaks that I thought would help it in combat.

This phase of the project was implemented with a single goal: defeat the sample robots.

Design:
  • Movement - based on scan events. Robot will move towards scanned enemies in a circular fashion to avoid getting hit. The following methods have also been overidden: onHitWall - Robot backs away from wall 120 pixels at 45 degrees. This ensures that the robot does not get stuck in a corner or on a wall where it can be easily preyed on. onHitByBullet - Robot will turn gun and radar towards enemy that fired and also move to avoid subsequent shots. onHitRobot - will fire at full power and attempt to ram the robot that it has collided with. This behavior is similar to the RamFire sample robot.
  • Targeting - attempts to keep it's radar locked on an opponent by realigning it's radar to face any scanned robots. If no scanned robots have been spotted, the robot will scan to the left and right to find the nearest robot. Also retargets to an enemy robot if hit by bullets from that enemy robot.
  • Firing - fires using firepower proportional to the distance from the target. Fires whenever an enemy robot is scanned.
Results (1-on-1) Won against all of the Main (not sampleex) sample robots except Walls:
  • Simple robots that were easily conquered: Crazy, Fire, Interactive, MyFirstJuniorRobot, PaintingRobot, SittingDuck, SpinBot, VelociRobot
  • Corners - initially I used a regular tracking implementation where I moved straight towards the target. This allowed Corners to lock on to me. By moving forward in a circular pattern and bouncing off the walls I was able to avoid most bullets and land shots of my own.
  • RamFire - I implemented a similar onHitRobot method to RamFire, but I increased the firepower to max power to inflict maximum damage. This overpowered RamFire's lesser firepower.
  • Tracker/Trackfire - Probably the next hardest to beat, but the circular movement combined with my targeting (that ironically is based off of Tracker) allowed me to stay mobile, avoid bullets, and destroy both of these robots consistently. Both robots use linear movement when moving toward a target.
  • Walls - I lost to this sample robot due to the distance this robot keeps from its target.
After submission of my robot for the tournament, I ran it against the following robots in the sampleex class:
  • Won: Alien, AlienComposition, Master and Slave, ProxyOfGrayEminence, Slave, MyFirstDroid,
Lessons Learned:
I really would've liked to explore some of the targeting algorithms that would've helped to increase accuracy when firing upon a moving robot. Also, the anti-gravity movement algorithm presented by IBM also looked very intriguing and I would've liked to see how well it performed. I also read an article about narrow radar locks and it's also something that seemed worth exploring to try to improve the targeting system.

I'm not sure how my robot will fare when pitted against robots with more complex movement implementations.

I also would've liked to have tested it in multiple/melee battles.

From a software development perspective, I would've liked to have modularized the code a little more. There are definitely some targeting statements that are repeated throughout the code.

Tournament Results:
Out of 25 robots, I made it into the semi-finals, losing to the eventual winner, bubonic. Bubonic was outfitted with Walls-type movement and predictive shooting. I lost all 4 rounds.

Overall, however, I was pleased with the outcome. My robot on preliminary melee battles with other students was found to have a glaring weakness towards Walls-class robots. So the outcome of the battle wasn't surprising at all.

Download:

Tuesday, September 7, 2010

07. Robocode

Initial thoughts:
This is a get-your-feet wet with Robocode project, which was designed by IBM initially before being adopted by the internet community. Our assignment is to create a series of starter robots to familiarize ourselves with Robocode prior to creating our tournament-ready version.

Robots:
  • Position01: 9/2/10 -The minimal robot. Does absolutely nothing at all.
  • Position02: 9/2/10 - Move forward a total of 100 pixels per turn. When you hit a wall, reverse direction.
  • Position03: 9/2/10 - Each turn, move forward a total of N pixels per turn, then turn right. N is initialized to 15, and increases by 15 per turn.
  • Position04: 9/5/10 - Move to the center of the playing field, spin around in a circle, and stop.
  • Position05: 9/4/10 - Move to the upper right corner. Then move to the lower left corner. Then move to the upper left corner. Then move to the lower right corner.
  • Position06: 9/4/10 - Move to the center, then move in a circle with a radius of approximately 100 pixels, ending up where you started.
  • Follow01: 9/12/10 - Pick one enemy and follow them.
  • Follow02: 9/12/10 - Pick one enemy and follow them, but stop if your robot gets within 50 pixels of them.
  • Follow03: 9/13/10 - Each turn, Find the closest enemy, and move in the opposite direction by 100 pixels, then stop.
  • Boom01: 9/7/10 - Sit still. Rotate gun. When it is pointing at an enemy, fire.
  • Boom02: 9/7/10 - Sit still. Pick one enemy. Only fire your gun when it is pointing at the chosen enemy.
  • Boom03: 9/11/10 - Sit still. Rotate gun. When it is pointing at an enemy, use bullet power proportional to the distance of the enemy from you. The farther away the enemy, the less power your bullet should use (since far targets increase the odds that the bullet will miss).
  • Boom04: 9/13/10 - Sit still. Pick one enemy and attempt to track it with your gun. In other words, try to have your gun always pointing at that enemy. Don't fire (you don't want to kill it).
This definitely seems like a fun project. There's a good deal of quality documentation out there and games are always fun. Some notes on a few of the implementations:

Position04:
After programming the first three positions, this position caught me a little off guard by the amount of trigonometry that was involved in the calculations. Overall though, I like math and it was still a fun exercise. I'm currently trying to modularize the code a little more for the subsequent tasks.

Modularization complete. Version 2.0 of Position04 here with some enhancements. I was able to get the robot to swivel directly to the desired angle, rather than setting it at 0 degrees first.
Without the use of the advanced robot class features, moving the robot in a complete circle of a set radius was simple, but it did have some drawbacks. To move it in a smooth circle I moved it at 1-5 degrees/turn, resulting in a very slow circular path.

Follow01:
I first implemented a simple tracking robot, but after reviewing the code from the Tracker robot packaged with Robocode, I opted to integrate it's more efficient radar movement into my robot.

Follow03:
This robot forced me to investigate the relationship between time and robot movement. I learned that a scan returns all robots detected, the first one being the closest one. I also gained some insight from the following site about what happens in the course of a single turn, in addition to the processing order during gameplay:


Final Thoughts:
This was an excellent (and fun) coding assignment. I learned a little bit about importing external files and .jar files into Eclipse, which I didn't have too much experience doing. I also improved my code-reading a little since the sample robot code is very simple and well-commented. As a final note, I've started to code every day - after a long layoff during summer - and this is going to help me immensely in my growth as a programmer. I just need to keep it up :)

On to the Tourney Robot:

I definitely want to implement a better radar function. This page seems to be worth looking into:


I'd also like to improve the robot's firing mechanism and how it adjusts for enemy robot movement as well as the defensive movement of the robot.

The Code:
Source code can be found here:

Saturday, September 4, 2010

Position04 Version 2.0

Re-did the methods in Position04.  There now exists a method that has a coordinate as a parameter that moves the robot to that coordinate.
Also, I minimized the spin rotation.  My previous code initially spins the robot to point to 0 degrees.  This made for simpler code but lengthened the spin time.  The code below now spins in direction that will produce the shortest rotation to point towards a destination coordinate.
Then, using Pythagorean, the robot moves from it's current position to the destination coordinate.
*************************************************************
package kgl;

import robocode.Robot;

/**
* Position 04 Robot
*
* Move to the center of the playing field, spin around in a circle, and stop.
*
* @class ICS 413
* @author Kevin Leong
* @date 9/2/10
*/

public class Position04 extends Robot{

/*
* Run Method
*/

public void run(){
//Get battlefield dimensions
double width = getBattleFieldWidth();
double height = getBattleFieldHeight();

//Assign coordinates for center and starting position 'current'
Position center = new Position(width/2, height/2);

//Go to the Center
goToCoordinate(center);

//Spin - We're Done!
double heading = getHeading();
turnRight(360 + 360 - heading);
}

/*
* Method that allows input of a coordinate and robot will go to
* that coordinate and stop
*
* @param Position p - x and y coordinate of destination
* @return Void
*/

private void goToCoordinate(Position p){
//Get Current Position
Position current = new Position(getX(), getY());

//Get current heading
double currentHeading = getHeading();

//Variable for recalibrating heading to -180 < 0 < 180
//based on turnRight()
double currentHeadingNormalized;

//Calculate the Distance and angle from the current point
//to the destination point
DistanceAngle ad = current.angleDistanceBetweenTwoPoints(p);

//Convert Heading to be between -180 and 180 only
if(currentHeading > 180){
currentHeadingNormalized
= (-1) * (360 - currentHeading);
}
else
currentHeadingNormalized = currentHeading;

//Get the absolute difference between normalized heading and
//angle to destination point
double angleDeltaAbsolute = Math.abs(Math.abs(currentHeadingNormalized)
-
Math.abs(ad.angle));

//Following Statements minimize spinning to point robot in position of
//destination point

//If current heading (normalized) is negative spin in the appropriate
//direction and the necessary rotation.
if (currentHeadingNormalized < 0){

//If angle and heading are both negative and angle is larger negative
if (ad.angle < currentHeadingNormalized){
turnLeft
(angleDeltaAbsolute);
}
else if (ad.angle < 0){
turnRight
(angleDeltaAbsolute);
}
else{
//If angle is positive then spin left or right depending on shortest
//rotation.
if (360 + ad.angle - currentHeading > 180){
turnLeft
(currentHeading - ad.angle);
}
else{
turnRight
(360 + ad.angle - currentHeading);
}
}

}

//Similar conditions for positive heading (normalized)
else{
if(ad.angle > currentHeadingNormalized){
turnRight
(angleDeltaAbsolute);
}
else if(ad.angle > 0){
turnLeft
(angleDeltaAbsolute);
}
else{
if (360 - currentHeading + ad.angle > 180){
turnLeft
(currentHeading - ad.angle);
}
else{
turnRight
(360 + currentHeading + ad.angle);
}
}
}

//At this point, the robot should be positioned to point towards
//the destiation point.

//Move Robot ahead the correct distance to the destination point
ahead(ad.distance);
}
}

/**
* Position Class to store position of center and starting position
* as coordinates. Also calculates:
*
* - Distance between two points
* - Angle between two points in degrees
*/
class Position{
double x;
double y;

public Position(double x, double y){
this.x = x;
this.y = y;
}

DistanceAngle angleDistanceBetweenTwoPoints
(Position p){
double a = this.x - p.x;
double b = this.y - p.y;

//Calculate distance using Pythagorean Theorem
double distance = Math.sqrt(Math.pow(a, 2) + Math.pow(b,2));

//Angle variables for converting angle to degrees
double angleRadians, angleDegrees;

//Get angle in radians to center
angleRadians = Math.atan(a/b);

//Convert radians to degrees. This represents angle
//if robot starts in quadrant III
angleDegrees = 180 * angleRadians/Math.PI;

//If robot starts in quadrant I or II
if(b > 0){
angleDegrees
= (180 - Math.abs(angleDegrees));

//If we are in quadrant I
if(a > 0){
angleDegrees
*= -1;
}
}

return new DistanceAngle(distance, angleDegrees);
}

}

/**
* Object to hold calculations on Distance and Angle
* Calculated in the Position Class
*/
class DistanceAngle{
double distance;
double angle;

public DistanceAngle(double distance, double angle){
this.distance = distance;
this.angle = angle;
}
}

Robocode Position04

I completed position04 a little while ago and it's been a while since I've used trig functions.  The most time was spent wrapping my head around radians again.
I'm quite proud of the code since it took a lot of diagramming and trial and error.  It's a pretty trivial task (moving a robot to the middle of the battlefield), but it still took a while.
I was trying for a while to use the getBearing() function, but this requires an event and I looked up a few items on creating custom events, but gave up and decided to go with the brute math instead.
Something I want to look at later is using the least amount of turning to position the robot to face the center.  As it is now, the robot rotates to a heading of 0 degrees before doing anything (this is to normalize the heading to a known heading of 0).
********************************************************************************
package kgl
;

import robocode.Robot;

/**
* Position 04 Robot
*
* Move to the center of the playing field, spin around in a circle, and stop.
*
* @class ICS 413
* @author Kevin Leong
* @date 9/2/10
*/

public class Position04 extends Robot{

public void run(){
//Get battlefield dimensions
double width = getBattleFieldWidth();
double height = getBattleFieldHeight();

//Assign coordinates for center and starting position 'current'
Position center = new Position(width/2, height/2);
Position current = new Position(getX(), getY());

//Get starting heading
double currentHeading = getHeading();

//Calculate the Distance and angle from the starting point to the center of the
//battlefield
DistanceAngle ad = current.angleDistanceBetweenTwoPoints(center);

//Align to 0 degrees
turnRight(360-currentHeading);

//Turn the robot to face toward the center
turnRight(ad.angle);

//Move Robot ahead the correct distance
ahead(ad.distance);

//Spin - We're Done!
turnRight(360);
}
}

/**
* Position Class to store position of center and starting position
* as coordinates. Also calculates:
*
* - Distance between two points
* - Angle between two points in degrees
*/
class Position{
double x;
double y;

public Position(double x, double y){
this.x = x;
this.y = y;
}

DistanceAngle angleDistanceBetweenTwoPoints
(Position p){
double a = this.x - p.x;
double b = this.y - p.y;

//Calculate distance using Pythagorean Theorem
double distance = Math.sqrt(Math.pow(a, 2) + Math.pow(b,2));

//Angle variables for converting angle to degrees
double angleRadians, angleDegrees;

//Get angle in radians to center
angleRadians = Math.atan(a/b);
System.out.println("AngleRadians: " + angleRadians);

//Convert radians to degrees. This represents angle
//if robot starts in quadrant III or IV (below the center of the battlefield)
angleDegrees = 180 * angleRadians/Math.PI;

//If robot starts in quadrant I or II
if(b > 0){
angleDegrees
= (180 - Math.abs(angleDegrees));

//If we are in quadrant I
if(a > 0){
angleDegrees
*= -1;
}
}

return new DistanceAngle(distance, angleDegrees);
}

}

/**
* Object to hold calculations on Distance and Angle
* Calculated in the Position Class
*/
class DistanceAngle{
double distance;
double angle;

public DistanceAngle(double distance, double angle){
this.distance = distance;
this.angle = angle;
}
}